Lesson 9: Building JavaScript Widget
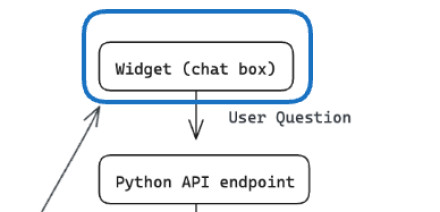
We are done with the Python part, as our application is now deployed. All we have left is to build a JavaScript widget for our client to use:

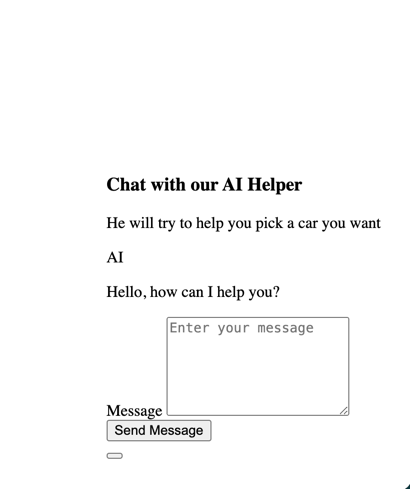
We will start building the following application part:
Creating a JavaScript Widget Project
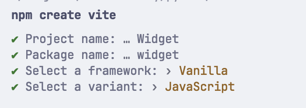
To make our lives easier, we will create a new Vite project:
npm create viteWe have selected these options:
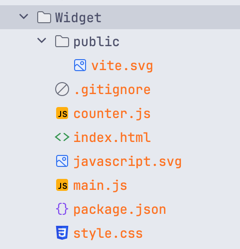
This will create the following folder structure:
Then we need to install the dependencies:
npm installAnd that's it. At this point, we have a fresh project with an example counter component. But we don't really need it, so let's clean it:
- Remove
public/vite.svg - Remove
counter.js - Remove
javascript.svg - Open
main.jsand remove all the content - Remove
style.css
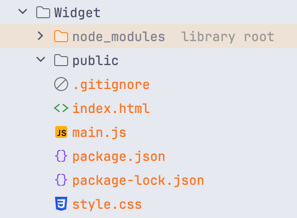
Once we are done, our project should look like this:
Creating the Widget
We can start our widget creation by opening main.js and adding the following logic:
- Creating a class
MessageWidget - Adding a constructor with a default position +
getPositionmethod to get the position of the widget - Initializing the widget with a function
initializeWidget - Exporting the widget
Note: To change the API URL, you must change the url property in the MessageWidget class.
class MessageWidget { constructor(position = "bottom-right") { this.position = this.getPosition(position); this.open = false; this.initialize(); // this.injectStyles(); } position = ""; open = false; widgetContainer = null; chatBox = null; messagesHistory = []; identifierToken = ''; // Our API URL url = 'http://127.0.0.1:8080/api/chat'; getPosition(position) { const [vertical, horizontal] = position.split("-"); return { [vertical]: "30px", [horizontal]: "30px", }; }} function initializeWidget() { return new MessageWidget();} window.chatWidget = initializeWidget();With the basic structure done, we need to push something to the screen. So, let's initialize the element creation:
class MessageWidget { // ... async initialize() { /** * Create and append a div element to the document body */ const container = document.createElement("div"); container.style.position = "fixed"; Object.keys(this.position).forEach( (key) => (container.style[key] = this.position[key]) ); document.body.appendChild(container); /** * Create a button element and give it a class of button__container */ const buttonContainer = document.createElement("button"); buttonContainer.classList.add("button__container"); /** * Create a span element for the widget icon, give it a class of `widget__icon`, and update its innerHTML property to an icon that would serve as the widget icon. */ const widgetIconElement = document.createElement("span"); // widgetIconElement.innerHTML = MESSAGE_ICON; widgetIconElement.classList.add("widget__icon"); this.widgetIcon = widgetIconElement; /** * Create a span element for the close icon, give it a class of `widget__icon` and `widget__hidden` which would be removed whenever the widget is closed, and update its innerHTML property to an icon that would serve as the widget icon during that state. */ const closeIconElement = document.createElement("span"); // closeIconElement.innerHTML = CLOSE_ICON; closeIconElement.classList.add("widget__icon", "widget__hidden"); this.closeIcon = closeIconElement; /** * Append both icons created to the button element and add a `click` event listener on the button to toggle the widget open and close. */ buttonContainer.appendChild(this.widgetIcon); buttonContainer.appendChild(this.closeIcon); /** * Create a container for the widget and add the following classes:- `widget__hidden`, `widget__container` */ this.widgetContainer = document.createElement("div"); this.widgetContainer.classList.add("widget__hidden", "widget__container"); /** * Invoke the `createWidget()` method */ this.createWidgetContent(); /** * Append the widget's content and the button to the container */ container.appendChild(this.widgetContainer); container.appendChild(buttonContainer); buttonContainer.addEventListener("click", this.toggleOpen.bind(this)); this.chatBox = document.getElementById('widget__messages_box'); this.scrollToBottom(); }}Now that we have our base structure initialized, we can add the createWidgetContent method:
Note: This is where you can modify the widget's layout. You can add more elements, change the layout, etc.
class MessageWidget { // ... // This method is responsible for the layout of the widget createWidgetContent() { this.widgetContainer.innerHTML = ` <header class="widget__header"> <h3>Chat with our AI Helper</h3> <p>He will try to help you pick a car you want</p> </header> <div class="widget__messages_box" id="widget__messages_box"> <div class="container"> <span>AI</span> <p>Hello, how can I help you?</p> </div> </div> <form> <div class="form__field"> <label for="widget__message">Message</label> <textarea id="widget__message" name="message" placeholder="Enter your message" rows="6" ></textarea> </div> <button onclick="return chatWidget.sendMessage();">Send Message</button> </form> `; }}Next, we need to handle the opening and closing of the widget:
class MessageWidget { // ... toggleOpen() { this.open = !this.open; if (this.open) { this.widgetIcon.classList.add("widget__hidden"); this.closeIcon.classList.remove("widget__hidden"); this.widgetContainer.classList.remove("widget__hidden"); this.scrollToBottom(); } else { this.widgetIcon.classList.remove("widget__hidden"); this.closeIcon.classList.add("widget__hidden"); this.widgetContainer.classList.add("widget__hidden"); } }}Next on our list are message templates for the user and the AI:
Note: This is where you can modify the message templates for the user and the AI. You can add more elements, change the layout, etc.
class MessageWidget { // ... messageTemplate() { return '<div class="container">\n<span>##USER##</span>\n<p>##MESSAGE##</p>\n</div>'; } aiTypingTemplate() { return '<div class="container" id="widget__message_ai_typing"><span>AI</span><p>Typing response...</p></div>'; }}Of course, AI typing message means that we need to add/remove the indicator, so let's add those methods:
class MessageWidget { // ... addAiTyping() { this.chatBox.innerHTML += this.aiTypingTemplate(); this.scrollToBottom(); } removeAiTyping() { let aiTyping = document.getElementById('widget__message_ai_typing'); aiTyping.remove(); }}We have covered the templates and some actions, but we still need a way to identify the user:
class MessageWidget { // ... retrieveIdentifier() { // You can retrieve the identifier from the localStorage and use it for chat history if needed // We have skipped this part. Each reload is new session this.identifierToken = Date.now().toString(36) + Math.random().toString(36).substring(2); localStorage.setItem('widget__identifier', this.identifierToken); return this.identifierToken; }}Finally, we can send the message:
class MessageWidget { // ... sendMessage() { // Get the message let messageBox = document.getElementById('widget__message'); let message = messageBox.value; messageBox.value = ''; // Save the message to messages list this.addMessage(message, 'You'); this.addAiTyping(); // Send GPT prompt to the server this.requestResponse(message) .then((resp) => { this.removeAiTyping(); // Add the message to the chat box this.addMessage(resp.data.answer, 'AI'); // Scroll the chatbox automatically this.scrollToBottom(); }); // Prevent form submission return false; } sendMessage() { // Get the message let messageBox = document.getElementById('widget__message'); let message = messageBox.value; messageBox.value = ''; // Save the message to messages list this.addMessage(message, 'You'); this.addAiTyping(); // Send GPT prompt to the server this.requestResponse(message) .then((resp) => { this.removeAiTyping(); // Add the message to the chat box this.addMessage(resp.data.answer, 'AI'); // Scroll the chatbox automatically this.scrollToBottom(); }); // Prevent form submission return false; } async requestResponse(message) { const resp = await fetch(this.url, { method: "POST", body: JSON.stringify({ "query": message, "identifier": this.retrieveIdentifier() }), headers: { "Content-type": "application/json; charset=UTF-8" } }); const data = await resp.json(); if (data.data.answer == null) { return this.requestResponse(message) } else if (data.data.answer) { return data; } }}And, of course, let's push those messages to the chat box:
class MessageWidget { // ... addMessage(message, sender) { this.messagesHistory.push({ message, sender, }); let messageTemplate = this.messageTemplate(); messageTemplate = messageTemplate.replace('##USER##', sender); messageTemplate = messageTemplate.replace('##MESSAGE##', message); this.chatBox.innerHTML += messageTemplate; }}And finally, we need to scroll to the bottom of the chat box when we add a new message:
class MessageWidget { // ... scrollToBottom() { this.chatBox.scrollTop = this.chatBox.scrollHeight; }}Now if we run our project with npm run dev, we should see the widget on the screen:
We will style our widget in the next lesson and make it look better.
- Intro: Structure and Preparation
- AI Engine and Main Python Script
- Front-end JavaScript Widget
- Bonus
No comments or questions yet...