Lesson 6: 06 - Chatbot "Clients": Terminal and Web
Ok, so we have the response(s) from OpenAI. It's time to allow the script consumers to write their own questions, right?
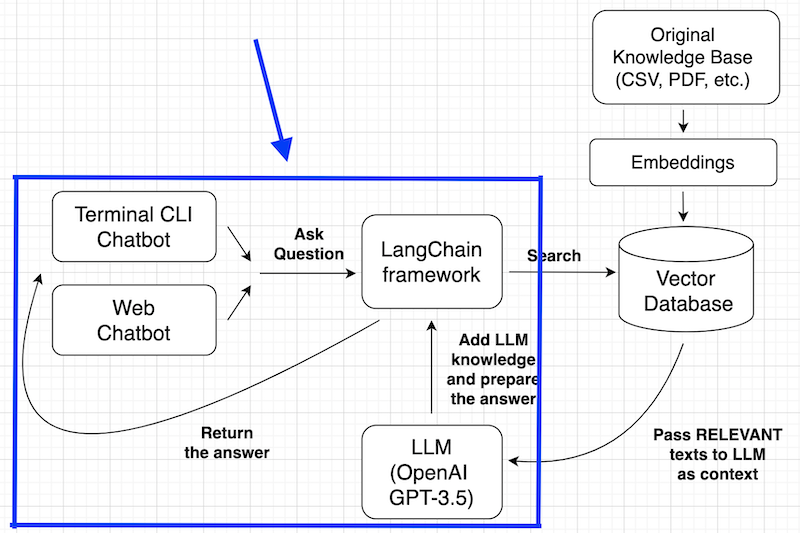
In this lesson, we will focus on this part of our global plan:
We will do it in two ways:
- CLI script to be launched from Terminal
- Web page like ChatGPT with Streamlit
Notice: for now, we won't cover the deployment of the chatbot to the production server or integrations with other tools like Telegram/Slack/etc. These are topics for the future tutorials. In this tutorial, we're talking about local use of the chatbot.
"Wrap" Chatbot into CLI Application
First, the Terminal version.
We will write the prompt via CLI input, launch the chain() function, remember the chat history, and continue until we write the prompt word like "exit".
To do that, let's refactor our Python script into two separate files: one will be responsible for the message chain (back-end) and another for the CLI input/output (front-end). This way, we could use the chain from both CLI and web a bit later.
chatbot_chain.py
import osfrom langchain.document_loaders.csv_loader import CSVLoaderfrom langchain_openai import OpenAIEmbeddingsfrom langchain_community.vectorstores import FAISSfrom langchain_openai import ChatOpenAIfrom langchain.memory import ConversationBufferMemoryfrom langchain.chains import ConversationalRetrievalChain def get_chatbot_chain(): os.environ["OPENAI_API_KEY"] = 'sk-...' loader = CSVLoader(file_path="faq.csv") documents = loader.load() vectorstore = FAISS.from_documents(documents, OpenAIEmbeddings()) memory = ConversationBufferMemory(memory_key='chat_history', return_messages=True) chain = ConversationalRetrievalChain.from_llm(llm=ChatOpenAI(), retriever=vectorstore.as_retriever(), memory=memory) return chainWe defined the chain as a function, and now we can import that function and use it in a separate CLI script chatbot_streamlit.py:
chatbot_cli.py
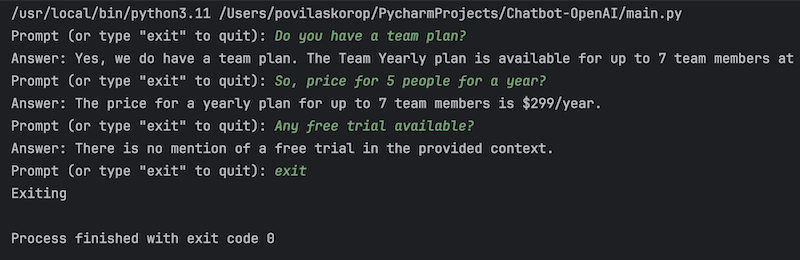
from chatbot_chain import get_chatbot_chainimport sys chain = get_chatbot_chain() while True: query = input('Prompt (or type "exit" to quit): ') if query == "exit": print('Exiting') sys.exit() response = chain.invoke({"question": query}) print("Answer: " + response["answer"])Here's a screenshot from my PyCharm after launching such a script:
Serve Chatbot as a Webpage with Streamlit
Another way to present our chatbot is to show is as a website, similar to the ChatGPT. For that, we will use the Streamlit framework for Python.
You can install it with pip install streamlit.
Then, we can import import streamlit as st on top and build a webpage with visual elements like st.chat_input() and st.chat_message() and others.
Inside that new chatbot_streamlit.py file, we will import and use the same get_chatbot_chain() method from the above script.
In this tutorial, I'm not planning to explain how Streamlit works, but what you need to understand is that we will use four concepts from it:
-
st.session_stateto save the messages as a Python list -
st.chat_messageto show those messages -
st.markdownto show the messages in Markdown -
st.chat_inputto ask for the user question
Everything else should be pretty self-explanatory. Here's the full code with comments:
chatbot_streamlit.py
from chatbot_chain import get_chatbot_chainimport streamlit as st chain = get_chatbot_chain() # URL for the logo of the assistant bot# We need it as a separate variable because it's used in multiple placesbot_logo = 'https://pbs.twimg.com/profile_images/1739538983112048640/4NzIg1h6_400x400.jpg' # We use st.session_state and fill in the st.session_state.messages list# It's empty in the beginning, so we add the first message from the botif 'messages' not in st.session_state: st.session_state['messages'] = [{"role": "bot", "content": "Hello, how can I help?"}] # Then we show all the chat messages in Markdown formatfor message in st.session_state['messages']: if message["role"] == 'bot': with st.chat_message(message["role"], avatar=bot_logo): st.markdown(message["content"]) else: with st.chat_message(message["role"]): st.markdown(message["content"]) # We ask for the user's question, append it to the messages and show belowif query := st.chat_input("Please ask your question here:"): st.session_state.messages.append({"role": "user", "content": query}) with st.chat_message("user"): st.markdown(query) # We create a new chat message and launch the "chain" for the answer with st.chat_message("assistant", avatar=bot_logo): message_placeholder = st.empty() result = chain.invoke({"question": query}) message_placeholder.markdown(result['answer']) # We also add the answer to the messages history st.session_state.messages.append({"role": "bot", "content": result['answer']})To view the result in the browser, we launch a local Streamlit server with our Python file as a parameter:
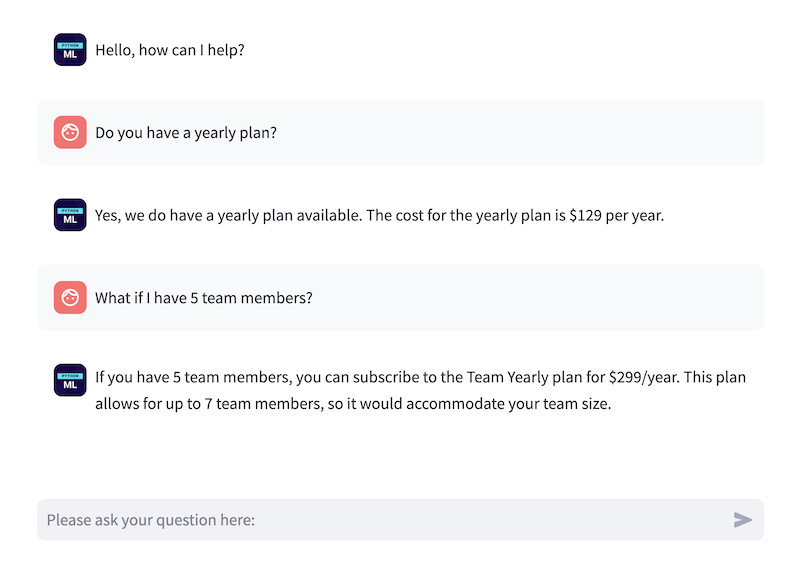
streamlit run chatbot_streamlit.pyAnd that's it, the chat is ready! After a few question-answer pairs, the result conversation is this:
It works!
Course Conclusion (For Now) and What's Next
So, this is where we end this tutorial for your first chatbot.
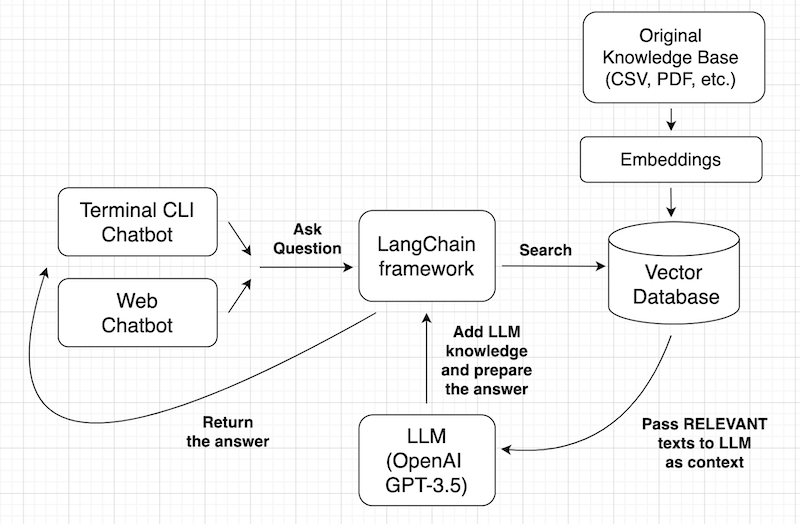
I will repeat the initial plan diagram, now you should understand it much better:
What's next, then?
Experiment with Alternative Tools
As you probably understand, the options for customizations are almost endless: each part of the process can be done in a different way or with different tools.
- Reading the knowledge base: from CSV, PDF, database, website, external API, etc.
- Splitting the documents into smaller chunks or not (and how exactly)
- Transform texts into embeddings: with OpenAI Embeddings, Cohere, or other providers
- Store into Vector database: FAISS, Chroma, Pinecone, Weaviate, and other tools
- LLM to use: OpenAI GPT (3.5 or 4?), Llama 2, etc. Load them locally or externally with a tool like Huggingface Hub.
- Present the chatbot as a Terminal script, API, web, Discord, Telegram, Slack, etc
- Use LangChain Agents, or use Llamaindex instead of LangChain
Experiment with Different Knowledge Base
The chatbot behavior also depends on the initial knowledge base: it may be much larger, with a not-so-clear structure, or presented inconveniently.
Then you may need to write custom Python code to transform that into a proper suitable data source.
Publish Your Chatbot
Finally, the process of publishing a chatbot to make it production-ready is another quite complex question, with many tools and options on how to do it.
In this course, we created it more like a tool for local individual use.
So we will leave those topics for future lessons, and we will update this course with the links to the future tutorials as they are published.
For now, thanks for reading this introductory course!
The source code is available in this repository.
Great tutorial, I hope to follow soon with the next steps, thank you very much for your time.
Great tutorial! Thanks a lot Povilas!
Thanks, great tutorial!
Thanks, it was nice to read and learn!